Manage Roles and Permissions
The Manage Roles and Permissions feature in the HR section allows administrators to define and control the access rights and permissions of different user roles within the system. This ensures that users have access to only the functionalities necessary for their role, enhancing security and efficiency.
Permissions List
The Permissions List is a critical feature in the HR section that allows administrators to view, manage, and control the access rights of different user roles within the system. This ensures that each user role has access only to the functionalities they need, enhancing the security and efficiency of the system.
Accessing the Permissions List
- Navigate to HR Section:
- From the main dashboard, click on the “HR” tab.
- Open Manage Roles:
- In the HR section, select “Manage Roles.”
- View Permissions List:
- Click on the “Permissions List” tab to view all available permissions.
Understanding the Permissions List
- Permissions Overview:
- The list displays all the permissions available in the system.
- Each row represents a specific permission, and each column represents a different user role (e.g., Admin, Parent, Teacher, Accountant, Student, etc.).
- Permission Columns:
- Columns are categorized by different roles such as Admin, Parent, Teacher, Accountant, Student, IT Incharge, Employee, etc.
- Each cell in the table can be checked or unchecked to allow or deny the specific permission for that role.
Editing Permissions
- Modifying Permissions:
- To grant or revoke permissions, check or uncheck the boxes corresponding to each role for a specific permission.
- Use the checkboxes to tailor access rights based on the responsibilities of each role.
- Quick Actions:
- Refresh: Click the “Refresh” button to reload the permissions list and reflect any recent changes.
- Allow all: Click this button to grant all permissions for a specific role.
- Deny all: Click this button to revoke all permissions for a specific role.
- Filter Permissions: Use the search box to quickly find specific permissions by name.
Key Permissions Categories
- Dashboard:
- Permissions related to viewing and managing dashboard elements such as absent students, absent staff, birthday lists, academic calendars, and personal attendance.
- Attendance:
- Manage permissions related to tracking and viewing attendance records for students and staff.
- Academic:
- Permissions related to academic activities, including subject management, timetable creation, and student performance tracking.
- Administrative:
- Permissions for administrative tasks such as user management, fee collection, and event management.
Saving Changes
- Apply Changes:
- Ensure that all modifications to the permissions are saved to enforce the new access rights.
- Review the permissions settings periodically to maintain optimal security and efficiency.
The Permissions List is a vital tool for administrators to ensure that each user role in the school management system has the appropriate level of access. By managing permissions effectively, the system maintains a secure and organized structure, allowing users to perform their duties efficiently while protecting sensitive information.

Creating a Permission
The “Create Permission” feature in the HR section allows administrators to define new permissions that can be assigned to various user roles within the system. This capability ensures that administrators can tailor the system’s access control to meet the specific needs of their institution.
Steps to Create a Permission
- Navigate to HR Section:
- From the main dashboard, click on the “HR” tab.
- Open Manage Roles:
- In the HR section, select “Manage Roles.”
- Select Create Permission:
- Click on the “Create Permission” tab to open the permission creation interface.
Creating a New Permission
- Enter Permission Name:
- In the “Permission name” field, enter a descriptive name for the new permission. This name should clearly indicate what access or action the permission will grant.
- Save the Permission:
- Click the green “Create Permission” button to save the new permission.
- Cancel Add:
- If you decide not to create the permission, click the red “Cancel add” button to discard your changes and return to the previous screen.
Creating custom permissions allows administrators to fine-tune the access control within the school management system. By defining and assigning these permissions, institutions can ensure that users have the appropriate level of access to perform their duties effectively and securely.

Role List Management
The “Role List” feature within the HR section is designed to help administrators manage the various roles within the institution. This includes viewing, editing, and deleting roles, as well as managing the permissions assigned to each role. Proper role management ensures that users have the appropriate access to perform their duties effectively and securely.
Accessing the Role List
- Navigate to HR Section:
- From the main dashboard, click on the “HR” tab.
- Open Manage Roles:
- In the HR section, select “Manage Roles.”
- Select Role List:
- Click on the “Roles List” tab to open the list of roles within the institution.
Role List Interface
- Role Name: Displays the name of each role.
- Role Type: Indicates the type of role, such as admin, parent, teacher, etc.
- Actions:
- Edit: Allows you to modify the details and permissions of the role.
- Delete: Permanently removes the role from the system.
- Manage Permissions: Opens the permissions settings for the role, allowing you to define what actions and areas the role can access.
- Assign Users: Lets you assign specific users to the role.
Actions on the Role List
- Edit Role:
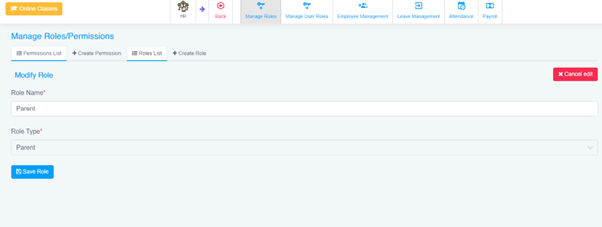
- Click the blue edit button next to a role to modify its details. This includes changing the role name or updating the role type. The “Modify Role” screen will appear where you can make the necessary changes and save them.
- Delete Role:
- Click the red delete button to remove a role. Confirm the deletion if prompted. Note that deleting a role cannot be undone and will remove the role from all users assigned to it.
- Manage Permissions:
- Click the black settings button to manage the permissions for a role. You can select or deselect permissions based on the role’s responsibilities.
- Assign Users:
- Click the green assign button to add or remove users from a role. This ensures that only the right individuals have access to specific functionalities within the system.
Example Roles and Their Typical Permissions
- Admin: Full access to all system functionalities, including user management, system settings, and reports.
- Teacher: Access to student records, class schedules, and grade input.
- Parent: View access to their child’s academic performance and attendance records.
- Student: Access to their own academic records, class schedules, and assignments.
- Accountant: Access to financial records, fee management, and payroll.
Effective role management is crucial for maintaining a secure and efficient school management system. By using the “Role List” feature, administrators can ensure that each user has the appropriate access to perform their tasks while safeguarding sensitive information and maintaining overall system integrity.

Create Role
The “Create Role” feature within the HR section allows administrators to define new roles within the institution. This functionality is essential for ensuring that all necessary roles are accounted for and that each role has the appropriate permissions and responsibilities assigned.
Accessing Create Role
- Navigate to HR Section:
- From the main dashboard, click on the “HR” tab.
- Open Manage Roles:
- In the HR section, select “Manage Roles.”
- Select Create Role:
- Click on the “Create Role” tab to start defining a new role.
Create Role Interface
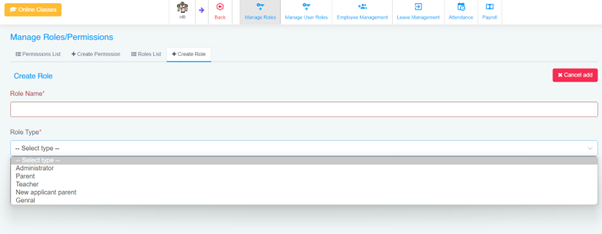
- Role Name: Input the name of the new role. This should be a clear and descriptive name that indicates the responsibilities associated with the role.
- Role Type: Select the type of role from the dropdown menu. Available options include:
- Administrator
- Parent
- Teacher
- New Applicant Parent
- General
Steps to Create a Role
- Enter Role Name:
- In the “Role Name” field, type the name of the new role. Make sure the name accurately reflects the role’s purpose.
- Select Role Type:
- Use the dropdown menu to select the appropriate role type. This helps categorize the role and may determine the default permissions associated with it.
- Save Role:
- Click the “Create Role” button to save the new role. This will add the role to the system, and you can then assign permissions to it as needed.
Example Role Creation
- Role Name: “Library Manager”
- Role Type: Select “General” from the dropdown menu.
- Save Role: Click the “Create Role” button.
After creating the role, you can proceed to the “Permissions List” to assign specific permissions to the “Library Manager” role. This ensures that the role has access to the relevant sections of the system required to perform their duties.
The “Create Role” feature is a crucial aspect of managing user access and responsibilities within the institution. By defining roles clearly and assigning appropriate permissions, administrators can maintain a secure and efficient system where users can perform their tasks effectively.
Manage User Roles
The “Manage User Roles” feature allows administrators to assign specific roles to users, thereby controlling their access and permissions within the system. This section is crucial for maintaining the security and efficiency of the institution’s management system.
Accessing Manage User Roles
- Navigate to HR Section:
- From the main dashboard, click on the “HR” tab.
- Open Manage User Roles:
- In the HR section, select “Manage User Roles.”
User Roles List Interface
- User: Displays the name of the user.
- Role: Indicates the role assigned to the user (e.g., admin, teacher, etc.).
- Action: Provides options to manage user roles, including the ability to delete a user role.
Actions
- Delete Role:
- The red trash bin icon under the “Action” column allows administrators to remove a specific role assigned to a user. This is useful when a user no longer requires certain access or permissions.
Steps to Manage User Roles
- View User Roles:
- The User Roles List provides a comprehensive view of all users and their assigned roles. This list helps administrators quickly assess and manage roles within the institution.
- Delete a Role:
- To delete a role, click the red trash bin icon next to the user’s role. A confirmation prompt will appear to ensure that the deletion is intentional.
Example of Managing User Roles
- View Current Roles:
- User: “Rahul Anand”
- Role: “admin”
- Action: Click the red trash bin icon to delete the “admin” role from Rahul Anand.
- Assign New Roles:
- After deleting a role, you can navigate to “Create User Role” to assign a new role if needed.
The “Manage User Roles” feature ensures that users have the appropriate access and permissions to perform their tasks. By regularly reviewing and managing user roles, administrators can maintain a secure and efficient system, ensuring that all users can perform their duties without unnecessary access to sensitive information.

Create User Role
The “Create User Role” feature allows administrators to assign specific roles to users, thereby controlling their access and permissions within the system. This section is crucial for maintaining the security and efficiency of the institution’s management system.
Accessing Create User Role
- Navigate to HR Section:
- From the main dashboard, click on the “HR” tab.
- Open Manage User Roles:
- In the HR section, select “Manage User Roles.”
- Create User Role:
- Click on the “Create User Role” tab.
Interface Overview
- Select User: A text box where you input the name of the user to whom you want to assign a role.
- Select Role: A dropdown menu where you can select the role you want to assign to the user.
Steps to Create a User Role
- Select User:
- Enter the name of the user in the “Select User” text box. Ensure you type the name correctly to find the user in the system.
- Select Role:
- From the dropdown menu under “Select Role,” choose the appropriate role for the user. The roles available include:
-
-
- Admin
- Parent
- Teacher
- Accountant
- Student
- IT incharge
- Employee
- PRINCIPAL OFFICE DESK
- Prefect
- +2 Coordinator
- Vice Principal
- Principal
- Asst. IT Incharge
- Test Role
-

- Create Role:
- After selecting the user and the role, click on the green “Create Role” button to assign the role to the user.
- Cancel Add:
- If you change your mind or need to abort the process, click the red “Cancel add” button to discard the changes.
Example of Creating a User Role
- Assigning a Role to a User:
- Select User: “Rahul Anand”
- Select Role: “Teacher”
- Click “Create Role” to assign the “Teacher” role to Rahul Anand.
The “Create User Role” feature is essential for ensuring that users have the appropriate access and permissions to perform their tasks. By assigning roles correctly, administrators can maintain a secure and efficient system, ensuring that all users can perform their duties without unnecessary access to sensitive information.
Employees Section
The Employees section in the Cutebrains School Management System provides a comprehensive interface for managing all staff members of an institution. This includes viewing detailed information about each employee, managing their roles and permissions, and keeping track of their employment status.
Main Features
- Employee List
- Search and Filter: You can search for employees by name and filter the list by department, designation, and role.
- Total Employees Count: Displays the total number of employees at the top right corner.
- Employee Information
- Photo: Displays a photo of the employee.
- Name: The full name of the employee.
- Department: Indicates the department the employee belongs to (e.g., Senior Teaching, Non-Teaching, Administrative).
- Phone: Contact phone number of the employee.
- Fingerprint No.: Unique fingerprint number used for attendance and access control.
- Pay Grade: The pay grade or level of the employee.
- Joining Date: The date the employee joined the institution.
- Status: Indicates whether the employee is currently active or inactive.
- Job Status: Additional status information like probation period.
- Action Buttons
- Profile (Purple Button): View detailed profile information of the employee.
- Roles and Permissions (Yellow Button): Manage the roles and permissions assigned to the employee.
- Edit (Green Button): Edit the employee’s information.
- Delete (Red Button): Remove the employee from the system.
How to Use
- Viewing Employee Details
- Navigate to the Employees section to see the list of all employees.
- Use the search bar to find specific employees by name.
- Use the dropdown filters to narrow down the list by department, designation, or role.
- Adding a New Employee
- Click on the “Add Employee” button located at the top right.
- Fill in the required fields such as name, department, phone, etc.
- Assign roles and set the status before saving the new employee.
- Managing Existing Employees
- Click on the profile button to view detailed information about an employee.
- Use the roles and permissions button to update the access levels of an employee.
- Edit employee information by clicking the edit button and making necessary changes.
- If an employee is no longer with the institution, you can delete their record by clicking the delete button.
By effectively using the Employees section, school administrators can ensure that all staff-related information is managed efficiently, leading to better organization and streamlined operations within the institution.

Add Employee
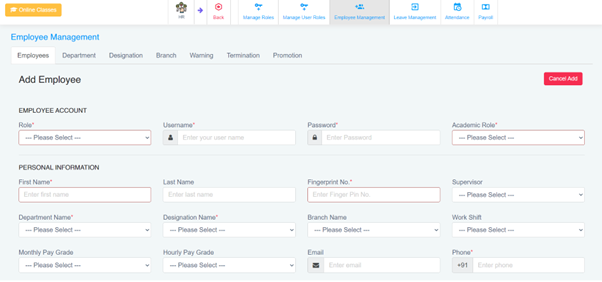
- Click “Add Employee”: Located in the upper right corner.
- Fill in the form with necessary details:
- Employee Account: Role, Username, Password, Academic Role
- Personal Information: Name, Fingerprint No., Supervisor, Department, Designation, Branch, Work Shift, Pay Grades, Email, Phone etc
- Save the Employee: Click on “Create Employee” to save.
Department Section
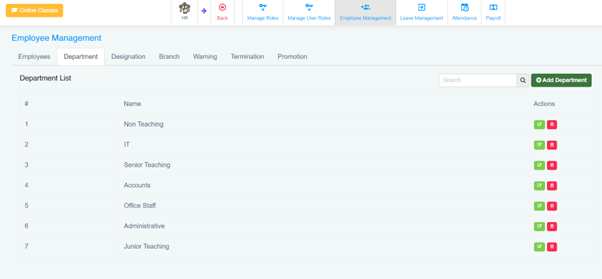
The Department section allows administrators to manage different departments within the institution, ensuring a structured and organized environment.
Features:
- Department List:
- Displays a list of all departments with a unique identifier (#), name, and action buttons for each department.
- The action buttons include options to edit (green) or delete (red) the department.
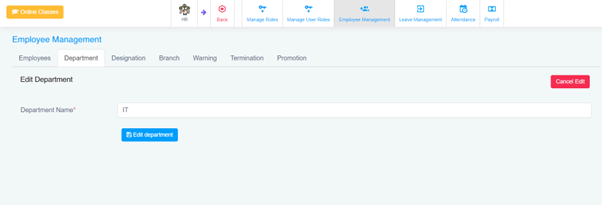
- Add Department:
- Clicking the ‘Add Department’ button opens a form to enter the name of a new department.
- This ensures that all departments are appropriately categorized and can be managed efficiently.
Designation Section
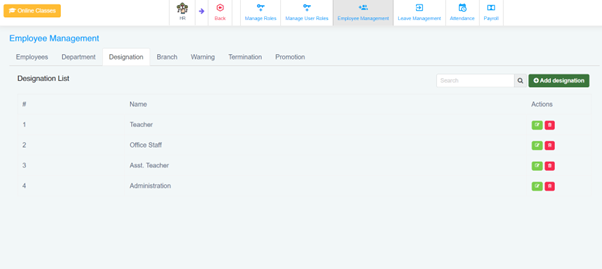
The Designation section is used to manage the various job titles or designations within the institution. It allows for clear hierarchical and functional structuring of roles.
Features:
- Designation List:
- Displays a list of all designations with a unique identifier (#), name, and action buttons.
- The action buttons include options to edit (green) or delete (red) the designation.
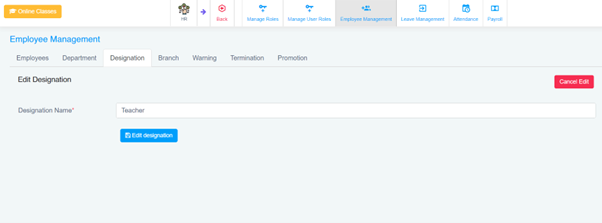
- Add Designation:
- Clicking the ‘Add Designation’ button opens a form to enter the name of a new designation.
- This helps in maintaining clarity on the roles and responsibilities assigned to each position.
Branch Section
The Branch section allows administrators to manage the different branches of the institution, facilitating better organization and oversight.
Features:
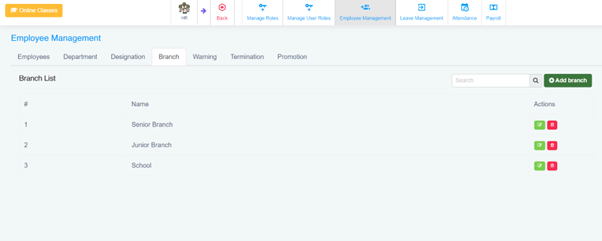
- Branch List:
- Displays a list of all branches with a unique identifier (#), name, and action buttons.
- The action buttons include options to edit (green) or delete (red) the branch.
- Add Branch:
- Clicking the ‘Add Branch’ button opens a form to enter the name of a new branch.
- This helps in maintaining accurate records of the various branches and their associated details.

Warning Section
The Warning section is used to document and manage any warnings issued to employees. This ensures that all disciplinary actions are recorded and can be referenced when needed.
Features:
Warnings List:
-
- Displays a list of all warnings issued to employees, including details such as the employee’s name, warning date, subject, warning type, and the person who issued the warning.
- If no warnings are issued, the list will display a message indicating the absence of warnings.
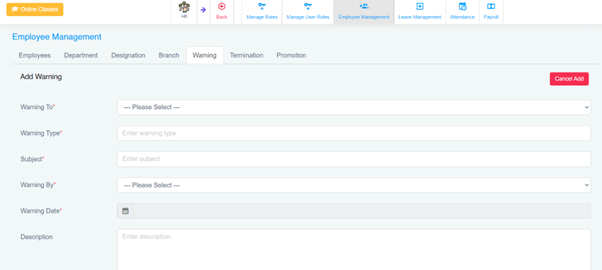
Add Warning:
- Clicking the ‘Add Warning’ button opens a form to issue a new warning.
- The form includes fields to enter the employee’s name, the date of the warning, the subject, the type of warning, and who issued it.

Termination Section
The Termination section in Employee Management handles the documentation and management of employee terminations.
Features:
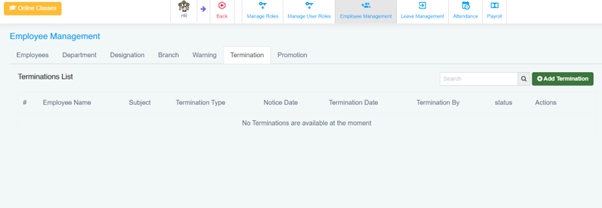
Terminations List: Displays all termination records with details like Employee Name, Subject, Termination Type, Notice Date, Termination Date, Termination By, and Status.
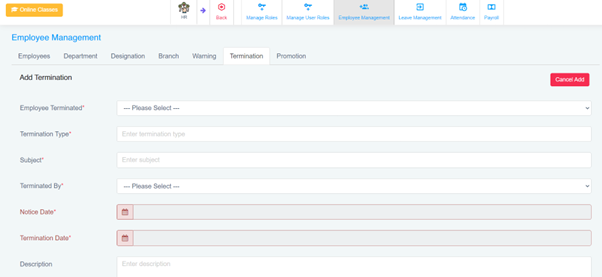
Add Termination: Button to open a form for recording new terminations with fields for Employee Name, Subject, Termination Type, Notice Date, Termination Date, Termination By, and Status.
Search and Filter: Options to search and filter termination records.
Action Buttons: Options to edit or delete termination records.
Steps:
View Terminations: Navigate to the Termination section to see all records.
Add Termination: Click “Add Termination,” fill in the details, and save.
Edit Termination: Click the “Edit” button next to a record, update the information, and save.
Delete Termination: Click the “Delete” button next to a record and confirm deletion.
Promotion Section
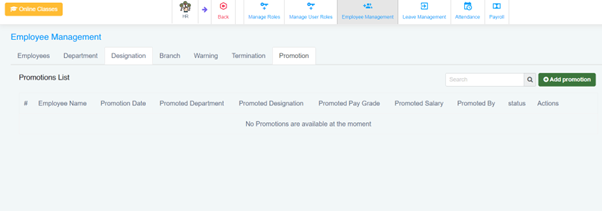
The Promotion section in Employee Management manages employee promotions.
Features:
Promotions List: Displays all promotion records with details like Employee Name, Promotion Date, Promoted Department, Promoted Designation, Promoted Pay Grade, Promoted Salary, Promoted By, and Status.
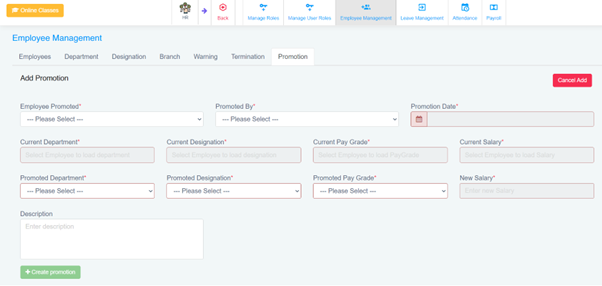
Add Promotion: Button to open a form for recording new promotions with fields for Employee Name, Promotion Date, Promoted Department, Promoted Designation, Promoted Pay Grade, Promoted Salary, Promoted By, and Status.
Search and Filter: Options to search and filter promotion records.
Action Buttons: Options to edit or delete promotion records.
Steps:
View Promotions: Navigate to the Promotion section to see all records.
Add Promotion: Click “Add Promotion,” fill in the details, and save.
Edit Promotion: Click the “Edit” button next to a record, update the information, and save.
Delete Promotion: Click the “Delete” button next to a record and confirm deletion.

Leave Management
The Leave Management section is designed to handle various aspects of leave and holiday management within the institution. It includes the following subsections:
Setup
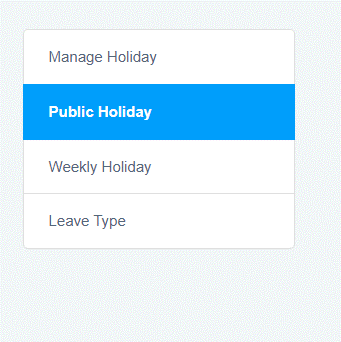
- Manage Holiday: This subsection allows administrators to manage all types of holidays, including public holidays, weekly holidays, and custom leave types.
- Public Holiday: Administrators can add, edit, or delete public holidays.
- Weekly Holiday: This option is for managing weekly holidays that recur every week.
- Leave Type: Administrators can define and manage different types of leaves such as sick leave, casual leave, etc.
Interface Elements
- Holiday List: Displays a list of holidays with details such as holiday name and actions (edit or delete). Administrators can add new holidays by clicking the “Add Holiday” button.
- The list can be filtered using a search bar for ease of navigation.
Leave Application
- This section allows employees to apply for leaves. Administrators can review, approve, or reject leave applications.
Report
- The report section provides detailed reports on leave applications, approvals, rejections, and overall leave status for the institution.
Add Holiday
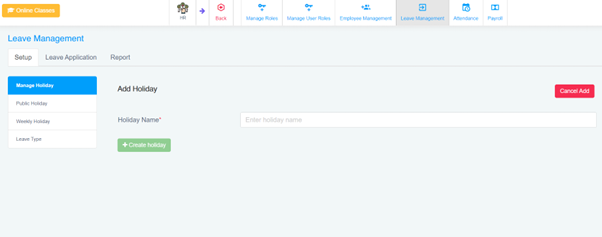
In the Leave Management section, administrators can add new holidays to the institution’s holiday list. The interface is straightforward:
Holiday Name: A text field where the name of the holiday is entered.
Create Holiday: A green button to add the holiday to the list.
Cancel Add: A red button to cancel the addition of a new holiday.
By organizing holidays and leaves efficiently, the Leave Management module ensures smooth operational management of employee leaves and maintains an accurate record for payroll and attendance purposes.
Leave Management
The Leave Management section in the HR module allows administrators to manage employee leaves efficiently. It includes three main tabs: Setup, Leave Application, and Report.
Setup
In the Setup tab, administrators can manage holidays, set public holidays, weekly holidays, and define different leave types.
- Manage Holiday: Here, administrators can view and edit the holiday list. They can add new holidays by clicking the “Add Holiday” button and entering the holiday name.
- Public Holiday: This section allows administrators to define public holidays.
- Weekly Holiday: This section allows administrators to set weekly holidays.
- Leave Type: Administrators can define various types of leaves employees can apply for.
Leave Application
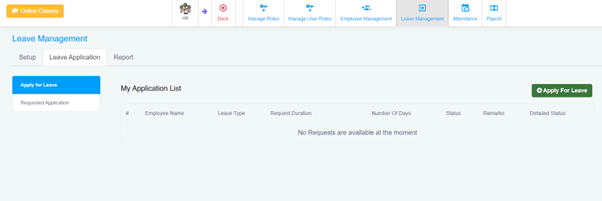
The Leave Application tab allows employees to apply for leaves and track their leave requests.
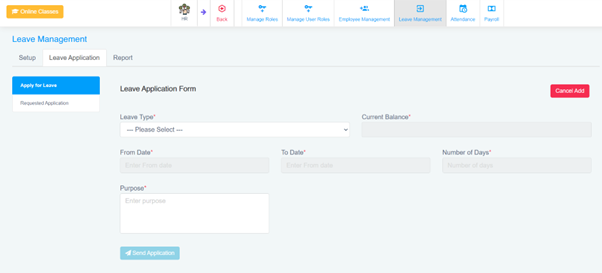
- Apply for Leave: Employees can fill out the leave application form, specifying the leave type, date range, and purpose of the leave.
- Requested Application: Employees can view the status of their leave requests, including the leave type, request duration, number of days, and status.
Report
This tab provides a summary of leave reports, which can be used by the HR department for tracking and managing leave records efficiently.
Leave Management – Report Section
The Report section in Leave Management provides comprehensive reports on employee leave. It helps administrators and employees track leave records and generate necessary reports for analysis.
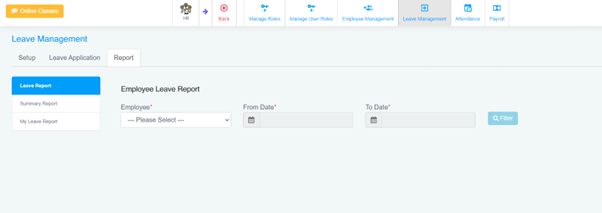
Employee Leave Report
This feature allows administrators to generate detailed leave reports for individual employees. The report can be filtered based on employee name and the date range.
- Employee Leave Report: Select the employee name from the dropdown list and specify the date range (From Date and To Date). Click the “Filter” button to generate the report.
Summary Report
This option provides a summary of all leave records within a specified period. It can be filtered to show data for different departments, leave types, or overall company leave records.
- Summary Report: View aggregated leave data for various employees and departments, helping in understanding leave patterns and trends.
My Leave Report
This report is personalized for individual employees to view their leave history and balance.
- My Leave Report: Employees can see a detailed view of their leave applications, approvals, and remaining leave balance.
By utilizing these reports, the HR department can effectively manage and monitor leave patterns, ensuring smooth operations and timely handling of leave requests.
Attendance Management – Manage Work Shifts
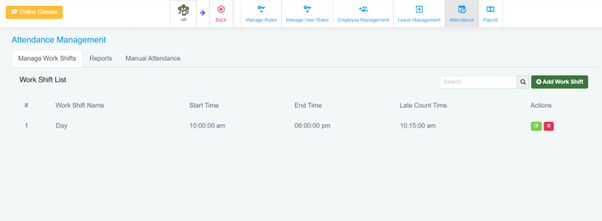
The Manage Work Shifts section in Attendance Management allows administrators to create, edit, and manage work shifts for employees.
Work Shift List
This list displays all the work shifts that have been set up. Each entry in the list includes:
- Work Shift Name: The name of the work shift.
- Start Time: The time when the work shift begins.
- End Time: The time when the work shift ends.
- Late Count Time: The time after which an employee is considered late.
Actions
For each work shift, there are action buttons:
- Edit Button (Green): Click to edit the details of the work shift.
- Delete Button (Red): Click to delete the work shift.
Adding a New Work Shift
- Add Work Shift Button: Click to add a new work shift. This will open a form where you can enter the details of the new work shift.
This section helps in organizing and managing the attendance system by defining clear work shifts for all employees.
Attendance Management – Reports
The Reports section in Attendance Management provides detailed insights into the attendance records of employees.
Daily Attendance
- Daily Attendance Tab: This tab displays the daily attendance records of employees for a selected date.
- Date Selector: Allows you to choose the specific date for which you want to view attendance records.
- Filter Button: Click to apply the selected date and view the corresponding attendance data.
The table below displays the following details for each employee:
- Department: The department to which the employee belongs.
- Date: The date of the attendance record.
- Employee Name: The name of the employee.
- In Time: The time the employee clocked in.
- Out Time: The time the employee clocked out.
- Working Time: The total working hours for the day.
- Late: Indicates if the employee was late.
- Late Time: The duration by which the employee was late.
- Over Time: The duration of overtime worked by the employee.
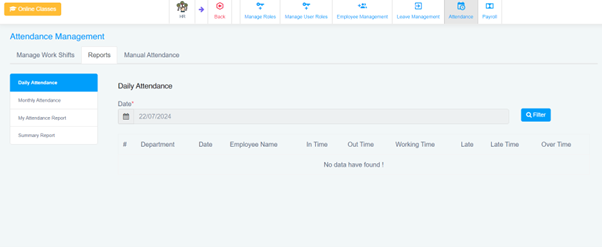
If no data is available for the selected date, a message “No data have found!” will be displayed.
Monthly Attendance
- Monthly Attendance Tab: View attendance records for the entire month.
My Attendance Report
- My Attendance Report Tab: Allows individual employees to view their own attendance records.
Summary Report
- Summary Report Tab: Provides a summary of attendance data for all employees over a specified period.
This section helps administrators and employees track attendance efficiently, ensuring accurate records and management of work hours.
Attendance Management – Manual Attendance
The Manual Attendance section in Attendance Management allows for the manual entry and review of employee attendance records.
Employee Attendance
Department Selector:
- Allows you to filter attendance records by selecting a specific department from the dropdown menu.
Date Selector:
- Choose the date for which you want to view or enter attendance records.
Filter Button:
- Click to apply the selected department and date filters to view the corresponding attendance data.
Attendance Table:
- Fingerprint No.: Unique identifier for each employee.
- Employee Name: Name of the employee.
- In Time: The time the employee clocked in.
- Out Time: The time the employee clocked out.
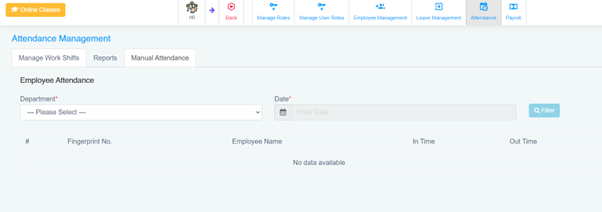
If no data is available for the selected date and department, a message “No data available” will be displayed.
Note: Only selected users with the appropriate permissions can access and modify manual attendance records.
This section is crucial for administrators to manually adjust and verify attendance data, ensuring accurate record-keeping and payroll processing.
